

How To Set Up An Archive Folder In Outlook 2013
Outlook for Microsoft 365 Outlook 2022 Outlook 2022 Outlook 2022 Outlook 2022 Outlook 2010 Outlook 2007 More...Less
Your Outlook mailbox is only so big, and information technology's a good bet that yous won't stop getting email anytime soon. To keep information technology from filling up, yous can motion former items you lot desire to keep to an archive, a split Outlook Data File (.pst) that you lot can open from Outlook any time you demand it.
Note:The Archive command and feature doesn't appear for whatsoever account in your Outlook profile if you include an Substitution Server business relationship and your system uses Microsoft Exchange Server Online Archive. Your network administrator tin also disable this feature.
By default, Outlook uses AutoArchive to annal items at a regular interval. To learn more, see Annal older items automatically.
You can as well annal items manually whenever you want. That fashion, yous can control which items to annal, where to shop them, and how old an item needs to be before information technology can be archived.
-
Exercise i of the following:
-
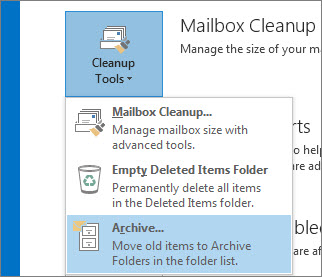
In Outlook 2022: Click File > Info > Cleanup Tools > Archive.
-
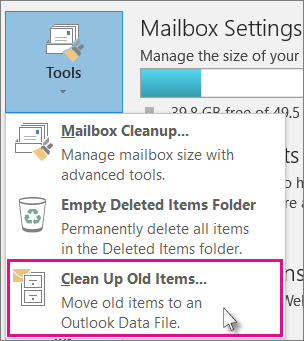
In Outlook 2022: Click File > Info > Tools > Make clean up old items
Tip:Archive and AutoArchive might not be available if your mail profile connects to an Exchange Server. Information technology'due south also possible that your organization has a mail retention policy that overrides AutoArchive. Check with your system ambassador for more information.
-
-
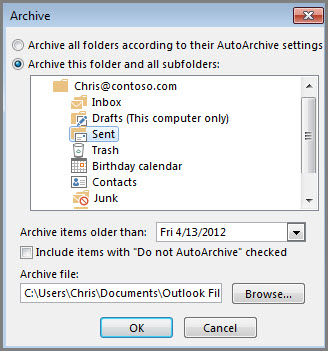
Click the Annal this binder and all subfolders pick, and choose the folder you want to archive.
-
Nether Annal items older than, enter a date.
-
Y'all can create multiple .pst files if y'all desire to archive some folders using different settings. For example, yous may want to keep items in your Sent binder longer than items in your Inbox folder.
-
Cheque the Include items with "Practice non AutoArchive" checked box to archive individual items that are excluded from automatic archiving. This option doesn't remove that exclusion from these items, but instead ignores the Do not AutoArchive setting for this annal only.
-
Click OK.
Turn off AutoArchive
To archive only when you want, plow off AutoArchive.
-
Click File > Options > Advanced.
-
Under AutoArchive, click AutoArchive Settings.
-
Uncheck the Run AutoArchive every n days box.
Of import: Office 2010 is no longer supported. Upgrade to Microsoft 365 to piece of work anywhere from any device and continue to receive back up.
Upgrade now
Past default, older Outlook items archived automatically on a regular interval. To larn more almost AutoArchive, see Use AutoArchive to dorsum up or delete items.
Y'all can also manually back upwardly and archive items, in add-on to AutoArchive or as a replacement. Manual archiving provides flexibility, and allows y'all to specify exactly which folders are included in the archive, and which archive Outlook Data File (.pst) is used.
To manually annal Outlook items, practise the following:
-
Click the File tab
-
Click Cleanup Tools.
-
Click Archive.
-
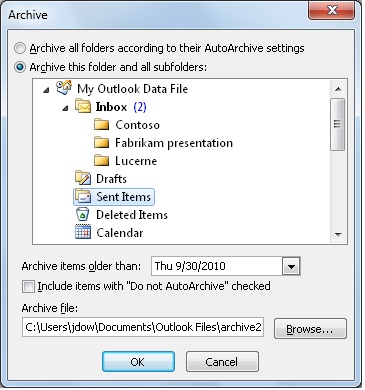
Click the Archive this binder and all subfolders option, and so click the folder that you want to annal. Any subfolder of the folder you select is included in this transmission annal.
-
Under Archive items older than, enter a date.
-
If you do not want to apply the default file or location, nether Archive file, click Browse to specify a new file or location. Browse to find the file that you lot want, or enter the file name, so click OK. The destination file location appears in the Archive file box.
-
Select the Include items with "Do not AutoArchive" checked check box to include any items that might be individually marked to be excluded from automatic archiving. This selection does non remove that exclusion from these items, but instead ignores the Practise not AutoArchive bank check box for this annal only.
Plow off AutoArchive
If you desire to archive only manually, yous must turn off AutoArchive. Do the following:
-
Click the File tab.
-
Click Options.
-
On the Advanced tab, under AutoArchive, click AutoArchive Settings.
-
Clear the Run AutoArchive every northward days cheque box.
Of import: Office 2007 is no longer supported. Upgrade to Microsoft 365 to work anywhere from any device and continue to receive support.
Upgrade now
AutoArchive, which is turned on by default, automatically moves old items to an annal location at scheduled intervals. However, you can manually support and archive items to a location that y'all specify.
Note:The Microsoft Office Outlook 2007 AutoArchive settings are customizable. Rather than backing up or archiving your items manually, you may notice that AutoArchive can run across your needs. For more information, see Using AutoArchive to back upward or delete items.
-
On the File menu, click Archive.
-
Select the Archive this folder and all subfolders pick, and and so specify a date under Archive items older than.

-
Under Archive file, click Browse to specify a new file or location if y'all exercise not want to utilize the default file or location.
-
Select the Include items with "Practice not AutoArchive" checked cheque box if you want to override a previous setting to non automatically archive specific items. If you choose to manually archive these items during this process, the items will again be subject to the Practice not AutoArchive setting unless you manually override that setting once more in the time to come.
-
Click OK.
Note:Outlook automatically creates another annal file for items in the folder and location specified.

How To Set Up An Archive Folder In Outlook 2013,
Source: https://support.microsoft.com/en-us/office/archive-items-manually-ecf54f37-14d7-4ee3-a830-46a5c33274f6
Posted by: brewsterdompaccough.blogspot.com
0 Response to "How To Set Up An Archive Folder In Outlook 2013"
Post a Comment